This Mama's Life

  • Home
  • About Me
    • Disclosure
    • Privacy Policy
  • Disney
    • Disney
    • Disney
    • Disney On Ice
    • Disney Printables
  • DIY
  • Holidays
    • Christmas
    • St Patrick’s Day
    • Easter
    • Mother’s Day
    • 4th Of July
    • Halloween
    • Gift Guides
  • Recipes
    • Appetizers
    • Cocktails
    • Entrees
    • Desserts
    • Drinks
    • Soy Sunday
  • Printables
  • Reviews
    • Adult
    • Baby
    • Clothing
    • Electronics
    • Fashion
    • Footwear
    • Kids
    • Movies
      • Kids
  • Travel
    • Chicago
    • Cruise
    • Hotels
      • Hotel
    • Michigan Events
      • Michigan

DIY “Bling” Soap Bars

February 5, 2018 Amy 20 Comments

Disclosure: Purchases made through links provide us with a small commission. As an Amazon Associate I earn from qualifying purchases. Please refer to our disclosure policy for more information.

Share
Pin58
Tweet
58 Shares

DIY “Bling” Soap Bars soap done

Do you have a little princess in the house?  If so, this is the perfect craft for you and her to do together.  If you’ve never tried to make your own decorative soap before, it is quite easy.  Add a little “bling” to your soap and Voila! Bling Soap Bars for a princess!

DIY “Bling” Soap Bars Supply List

DIY “Bling” Soap Bars soap ingredients 6 count Wilton silicone heart mold
20 oz melt and pour soap base
4-5 drops Vitamin E oil
1 teaspoon strawberry fragrance oil
1 teaspoon bubble gum fragrance oil
Lilac and red (or pink) soap colorants
6 plastic Valentine heart rings

DIY “Bling” Soap Bars  Directions

1.    Most melt and pour soap bases come in a large block with 1 oz cubes that can be cut/broken apart. Separate 20 of the cubes from the block of soap base.DIY “Bling” Soap Bars soap breaking up bar

2.   Chop or grate the soap cubes into smaller pieces and place half of them in a microwave bowl.

3.   Microwave half of the cubes for 45 seconds on HIGH and stir.  Continue to microwave in 20 second increments increments until completely melted.DIY “Bling” Soap Bars soap mixing in pink

5.   Add the strawberry fragrance oil and a few drops of the red or pink soap colorant to the melted soap and whisk to combine.

6.   Immediately, pour the melted “pink” soap into the heart-shaped molds, filling each mold half way. It will harden within 2 minutes of pouring into the molds.DIY “Bling” Soap Bars soap pouring pink

7.   Add the remaining soap cubes to a microwave safe bowl. Microwave on HIGH  for 45 seconds and stir.  Continue to microwave in 20 second increments until the soap is completely melted.DIY “Bling” Soap Bars soap mixing in blue

8.   Add the bubblegum flavoring oil and lilac soap colorant and stir well to combine. Pour into each heart mold and fill up to the top. Be sure to stir really good or some of the soap that settles to the top will remain white in color. (It will just give your soap a 3 layer look).

DIY “Bling” Soap Bars soap mold with gems added

9.   Wait 1 minute before gently placing a toy ring into the middle of each soap mold. The soap should be firm but not completely hardened.DIY “Bling” Soap Bars soap mold adding gems

10.   Place the silicone mold in the refrigerator and chill for 1 hour.

DIY “Bling” Soap Bars soap mold11.   Remove the soap bars from their molds and place in an airtight container for
storage up to 6 months!

12.  ENJOY!!DIY “Bling” Soap Bars 1

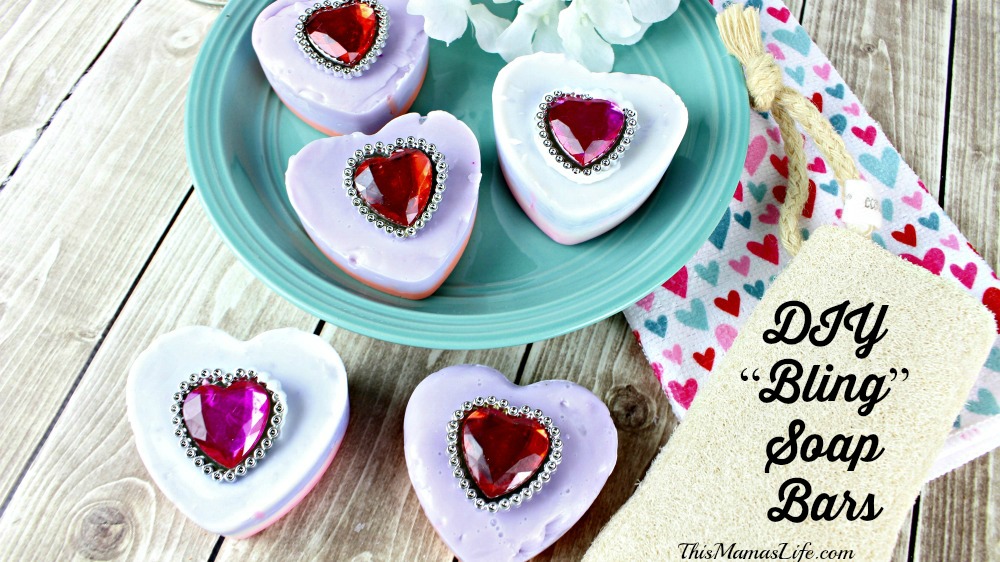
If you like this for Valentines Day, Check out some of our other crafts

DIY Conversation Heart Planter 

3 Ingredient Whipped Sugar Scrub

Crafts, Valentine's Day

About Amy

Workaholic turned SAHM to 3 amazing kids. Amy is a Social media lover turned blogger who writes about all things related to life: cooking, parenting, family events, drinks (Hey, we all need one once in a while!) and Local Michigan happenings.

Comments

  1. Stephanie Z says

    February 5, 2018 at 2:57 pm

    These are so cute! What a great idea. Thanks for sharing!

    Reply
  2. Kami Sundstrom says

    February 5, 2018 at 4:22 pm

    These are too cute! My 4 year old would love helping me make these!?

    Reply
  3. Karen Jaras says

    February 5, 2018 at 4:29 pm

    OMG How cute! I will have to make some with my granddaughter and let her top the bars off with bling.

    Reply
  4. Kara Vaughan Marks says

    February 5, 2018 at 5:28 pm

    How cute–these are just adorable!

    Reply
  5. Erin N says

    February 5, 2018 at 11:11 pm

    Wow! These are so cute! I’m gonna have to try this. Thanks so much for sharing!

    Reply
  6. Aubrey Lucas says

    February 6, 2018 at 12:51 pm

    Okay, this is so neat! I love the idea of making two layers of colors as well as the heart molds! I’ve always been curious about trying D-I-Y soap projects; the thought of being able to make your own unique type of soap is so cool to me. I may just have to start with this one. Thanks for sharing! 😀

    Reply
  7. CJ says

    February 7, 2018 at 6:37 pm

    These are really adorable… I am not very crafty but I would make an attempt at this… Thanks! 😀

    Reply
  8. Carrie Conley says

    February 8, 2018 at 5:13 pm

    These are so cute, I really need a new hobby

    Reply
  9. Judith Watson says

    February 13, 2018 at 5:15 pm

    I love this idea! I would like to amp the prize up for shower favors.

    Reply
  10. Calvin says

    July 12, 2018 at 2:56 pm

    Really cool idea.. adding some shine to it

    Reply
  11. shelly peterson says

    July 18, 2018 at 1:54 am

    I have never made soap before but these would be fun to make.

    Reply
  12. Dana Rodriguez says

    July 20, 2018 at 2:26 pm

    These are SO CUTE! I think they would make a nice gift or look pretty in a guest bathroom.

    Reply
  13. Keshari Herath says

    July 25, 2018 at 5:10 am

    I really wanted to make some soap. Luckily came through this now gonna try it.Thanks?

    Reply
  14. Veronica Lee says

    July 26, 2018 at 6:12 am

    I love, love, love these soap bars! So pretty!

    Reply
  15. Darlene Demell says

    July 26, 2018 at 3:00 pm

    These are really cute. My grandaughter would have fun making these. Thanks for sharing.

    Reply
  16. Jenny B says

    July 27, 2018 at 6:36 pm

    So beautiful! I would’ve went crazy over this as a kid! I definitely want to try to make this for my daughter.

    Reply
  17. Tina says

    July 28, 2018 at 5:15 am

    What a great idea to give someone very cool gift!

    Reply
  18. Kristi Friesen says

    July 28, 2018 at 11:37 pm

    These would be wonderful for myself but also would make a perfect gift. Handmade ones are always extra special.

    Reply
  19. Wanda B says

    December 3, 2018 at 8:01 pm

    These are so cute! I’d like to try making them.

    Reply
  20. Beth T. says

    May 23, 2019 at 4:02 pm

    What a cute idea for my niece who loves her “jewels”. Thanks for the step-by-step tutorial. Very clear and helpful.

    Reply

Leave a Reply Cancel reply

Your email address will not be published. Required fields are marked *

This site uses Akismet to reduce spam. Learn how your comment data is processed.

Meet Amy Workaholic turned SAHM to 3 amazing kids. Amy is a Social media lover turned blogger who writes about all things related to life: cooking, parenting, family events, drinks (Hey, we all need one once in a while!) and Local Michigan happenings.

Contact me at thismamaslifeblog (at) gmail.com
  • Facebook
  • Instagram
  • Pinterest
  • RSS
  • Twitter

Amazon Associate Disclosure

We are a participant in the Amazon Services LLC Associates Program, an affiliate advertising program designed to provide a means for us to earn fees by linking to Amazon.com and affiliated sites

Shop Here

Recent Posts

  • How to make gardening easier for yourself
  • Filter Your Water The Easy Way
  • Perfectly Cooked Meat With This Smallest Thermometer
  • Disney Genie: Everything You Need to Know About Disney’s New App
  • Positive Affirmations on Your Socks

Places I Belong

Categories

· © Copyright 2016 This Mama's Life · All Rights Reserved · Site Design Carol Jones Media