This Mama's Life

  • Home
  • About Me
    • Disclosure
    • Privacy Policy
  • Disney
    • Disney
    • Disney
    • Disney On Ice
    • Disney Printables
  • DIY
  • Holidays
    • Christmas
    • St Patrick’s Day
    • Easter
    • Mother’s Day
    • 4th Of July
    • Halloween
    • Gift Guides
  • Recipes
    • Appetizers
    • Cocktails
    • Entrees
    • Desserts
    • Drinks
    • Soy Sunday
  • Printables
  • Reviews
    • Adult
    • Baby
    • Clothing
    • Electronics
    • Fashion
    • Footwear
    • Kids
    • Movies
      • Kids
  • Travel
    • Chicago
    • Cruise
    • Hotels
      • Hotel
    • Michigan Events
      • Michigan

Halloween Treats – EyeBall Cake Pops

October 31, 2014 Amy 7 Comments

Disclosure: Purchases made through links provide us with a small commission. As an Amazon Associate I earn from qualifying purchases. Please refer to our disclosure policy for more information.

Share14
Pin4
Tweet
18 Shares

eyes1

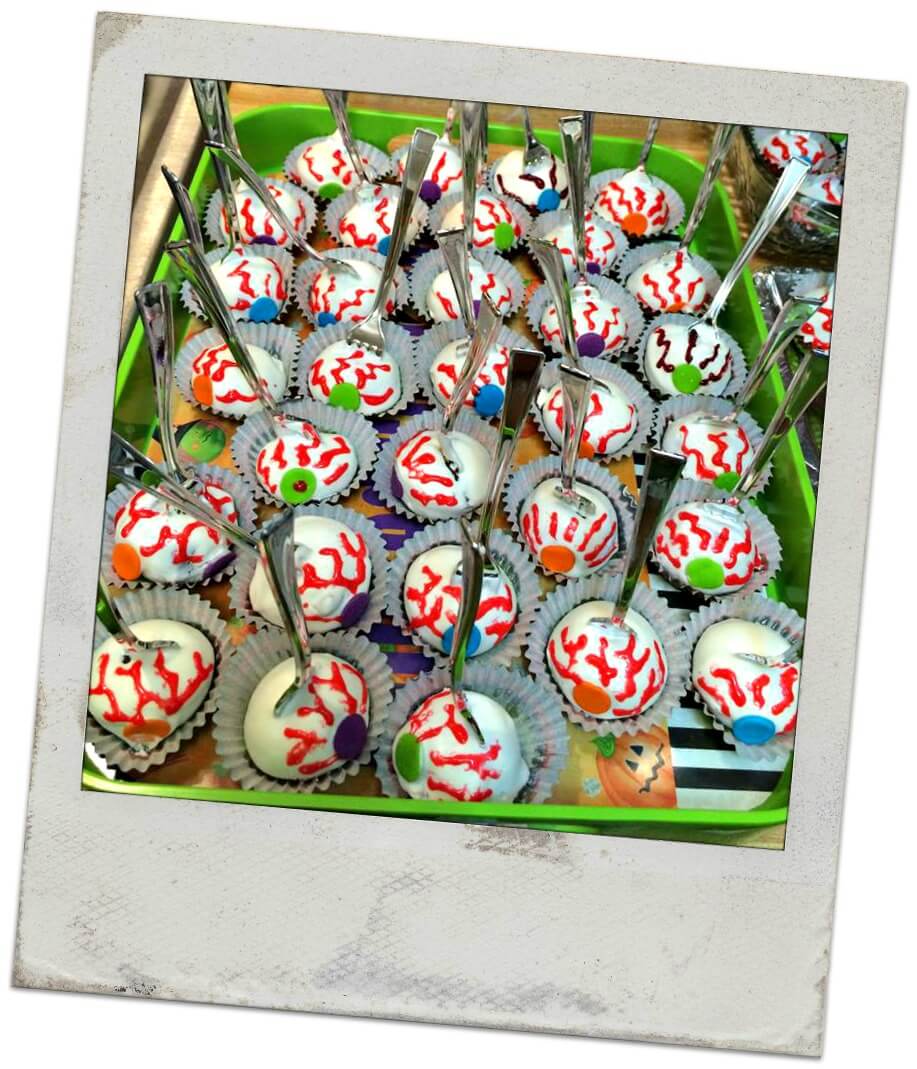
My name is Jayme I’m 20 and I’m a stay at home mom! I love to do all kinds of crafty stuff. My husband is in the military and his unit has a lot of parties so I always do a different cake pop for the party! Today I decided to make cake pop eye balls (on a fork)!
Course the ingredients depend on how many cake pops you make I made 72!
1 box= Duncan HInes Devil Food cake
1 tube =Wilton Red Sparkle Gel (vanes)
1 jar=Wilton Sprinkles (eye balls)
2 bags = WIlton Bright White Candy Melts!
Vegetable oil
and you can find the small silver forks at your local dollar store

If you know how to make the cake pops the long way that works to but i cheated this time around and used my new cake pop maker 

I always make sure to have a clear day and enough time to do the cake pops cause it is very time consuming! (even with the cake pop maker)
Using a cake pop maker
Step 1 – You mix you batter just follow the instructions on the back of the box that works for you
Step 2 – You bake them! Make sure you bake all of your batter so it gives your pops time to cool
Step 3 –  Wait for you pops to cool.. I let them sit out so this step take about 15-20 minutes.  You have to wait until your pops are cool to decorate
Step 4 – Take your candy melts and put them in a microwave safe bowl and depending on your watts put on 1 minutes and stir until all chips are melted (if 1 minute doesn’t work follow the instructions on the back of the bag)
Step 5 – Add some vegetable oil to your candy melts this will thin our your chocolate I didn’t measure how much I used I just went by how thin I wanted my chocolate coat to be (DO NOT SKIP adding some vegetable oil this s very important!)
Step 6- stick your fork into the ball and dip into the chocolate you can use a spoon or a spatula to push the chocolate over the pop once your ball is covered pull your pop out and stick your eyeball sprinkle on the cake pop! Set it down on a pan or somewhere to cool
Step 7 –  After your pops cool you will need to GENTLY pick them up off of what ever you cooled on ( BEWARE THE BOTTOM OF YOUR POP WILL PULL OFF SO DON’T FREAK OUT!)
step 8- place your pops in your cupcake thingy and add your vanes
You have cake pop eye balls on a fork!

If you do not have a Cake Pop Maker – you can find a tutorial on YouTube Here .  Then come back to finish the rest of the steps!HAPPY HALLOWEEN!

Desserts, Halloween, Recipes

About Amy

Workaholic turned SAHM to 3 amazing kids. Amy is a Social media lover turned blogger who writes about all things related to life: cooking, parenting, family events, drinks (Hey, we all need one once in a while!) and Local Michigan happenings.

Comments

  1. Amy G says

    October 31, 2014 at 1:56 pm

    Those look great! I so want a cake pop machine. I have a donut one and love it.

    Reply
  2. Marisa says

    October 31, 2014 at 3:16 pm

    I’ve always wanted to make cake pops, but never seem to make time! This is a fun recipe for Halloween!

    Reply
  3. Danielle @ We Have It All says

    November 3, 2014 at 11:57 am

    These are cool, I pinned this the other day 🙂

    Reply
  4. Courtney @ Joy Of Momma Joyner says

    November 5, 2014 at 5:50 pm

    Oh my goodness! These are so cute! 🙂 They would be so fun to take to a Halloween Party!

    Reply
  5. shelly peterson says

    November 9, 2014 at 3:21 pm

    These are pretty cool looking, perfect for a Halloween party. The kids would love these.

    Reply
  6. Janet W. says

    November 10, 2014 at 9:35 am

    This would be great to make for my grandsons class next year! So festive!

    Reply
  7. sneha says

    April 2, 2019 at 2:14 pm

    A great idea and they look delicious too. thanks for sharing

    Reply

Leave a Reply Cancel reply

Your email address will not be published. Required fields are marked *

This site uses Akismet to reduce spam. Learn how your comment data is processed.

Meet Amy Workaholic turned SAHM to 3 amazing kids. Amy is a Social media lover turned blogger who writes about all things related to life: cooking, parenting, family events, drinks (Hey, we all need one once in a while!) and Local Michigan happenings.

Contact me at thismamaslifeblog (at) gmail.com
  • Facebook
  • Google+
  • Instagram
  • Pinterest
  • RSS
  • Twitter

Amazon Associate Disclosure

We are a participant in the Amazon Services LLC Associates Program, an affiliate advertising program designed to provide a means for us to earn fees by linking to Amazon.com and affiliated sites

Shop Here

Recent Posts

  • How to make gardening easier for yourself
  • Filter Your Water The Easy Way
  • Perfectly Cooked Meat With This Smallest Thermometer
  • Disney Genie: Everything You Need to Know About Disney’s New App
  • Positive Affirmations on Your Socks

Places I Belong

Categories

· © Copyright 2016 This Mama's Life · All Rights Reserved · Site Design Carol Jones Media